How to make an Houdini
Following is based on a true story but with construed example data and production details to not stir the feelings of my judicial overlords.
That leaves the leafs. They rarely intersect with the wood. But they are all placed so that their attachment point is near a branch. Question: where is actually this attachment point defined? Answer: In the projected texture! Unfortunately it's unrealistic to expect our setup to figure out such property out just by looking at an image. So what do we do? Give up? Yes, in a way. We forfeit automation for a second and manually add a set of points for every texture our setup is using. A leafs attachment point is then the closest one to it in UV space. By projecting this point to the leaf in UV space we can then transform it to the leafs world space. The leaf can now ask, "this is my attachment point, what part is closest from here"?

This is a Houdini tutorial, topic being "Tree fracturing for games". The scenario is your job is making tools to make artistic people's life easier. One day you're given a mesh, it consists of a cluster of polygons hovering in space, no recollection of each other. And yet, you clearly see it holds a structure- the branches belongs to the trunk, the leafs belong to the branches. It's almost trivial. So why is it so hard to tell them to just clumpify? Is that a node?
 |
| before and after |
There's piles of books about vectors and the compilable struct products and who am I to add to that? With time I've also come to believe process is an underrated so I thought I take a stab at capturing that.
1. Preparation
Clean your desk. Throw all screens out but one. Feed your fish. Buy furniture from Bauhaus. Enter boredom.
Name your scene file. Turn on Auto Save. Prepare input data and stash it. (As I can't share work data I made a mock up that could match the technical description of one an artist could give you).
2. Think
Usually the step most people fail at. Leave your desk, write your solution on paper. Put it in pseudo code and abstract graphs until you can see the machine in your head. If you think Houdini will fill in the blanks you're wrong. If I see anyone moving nodes around they're dismissed.
To trust our result we need to trust in both our input data and process. Build with analytical solutions as opposed to approximate. For example, shooting of some rays to sample surrounding geometry will always bring noise to the result. On the other hand, with only one ray you can check if you're inside or outside a closed mesh.
Regardless of your solutions it will assume certain properties on the input and it's important to know what these are. The ray cast example above assumes your mesh is non manifold. Other properties can be a certain UV layout or that the mesh is triangulated. We make notes of such requirements and later check with the artist if they are OK. Unless they have runtime implications they usually are.
When seeking out the algorithm we identify our goal and then work backwards. Here we want to cut up the mesh and then partition the remaining polygons based on what part they are connected to.
For the cutting it's pretty clear we will use a boolean. That's a wheel no one wants to reinvent. We only need to remember to ask the artist to have the parts that should be cut up modeled as closed up non manifold geo.
The remainder should now be attached to these parts. As the input isn't connected in its topology we need other rules to describe connectivity. Inspecting the geo we can see most branches intersects with its parent branch at its joint, this is a rule- if a unconnected mesh intersects with a connected, then connect it to this. This looks like it should cover the wood part.
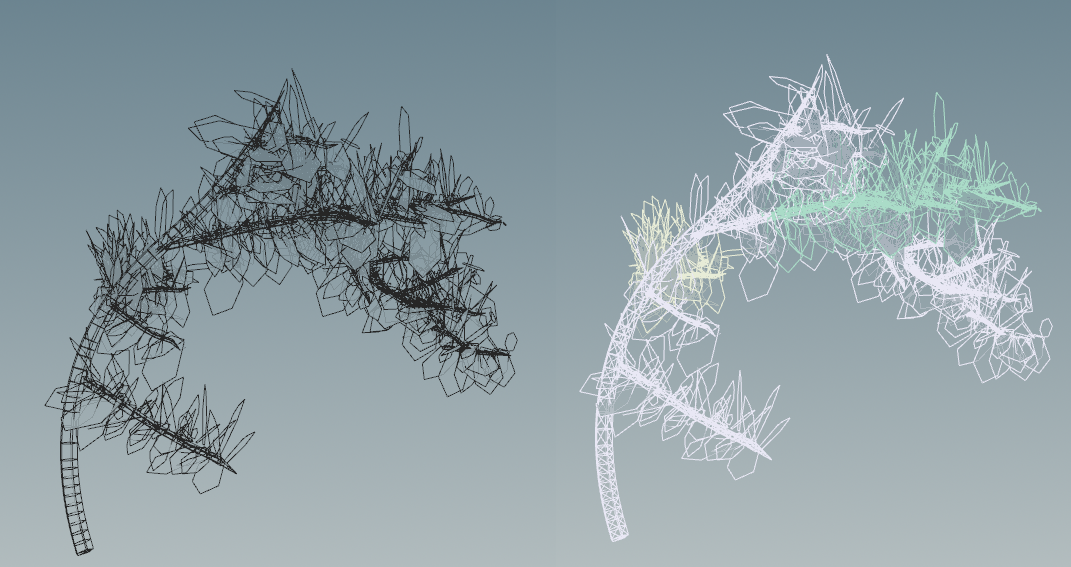
 |
| hovering leafs |
So we break the wood to parts, attach the first wood and then leafs. But wait- we don't know what's leafs and what's wood. It's costly to implement a material name convention just to tag leafs, this is often unreasonable to ask. A compromise here is to at least let artist two different materials for leafs and wood. This allows us to separate them without knowing which is what.
Looking closer at the mesh there is more to extract. The leafs are all modeled as polygons with open edges and this separates them from the wood parts that are cylinders with very few open edges. Meditating over this we can state the following: If we divide the geometry by material, the part that have the most open edges are the leafs. Now we know what's leafs and what's wood.
3. Design
There is nothing to add, nothing to take away. Perfection. You're allowed to add some nodes. All three of them- Null, Merge, Subnet. And maybe Switch if you're into that.
We create Sub networks for the functions found above. Separating wood from leafs is one, Splitting wood, Attaching wood and Attaching leafs. Between them we add null nodes that says what data that is expected to go in there. Before doing mine I had the same on paper, it was pretty much a 1 to 1 translation.

Take a breath. Are you still certain you understand the details of the implementations? Do you trust Houdini on all these points? If so, let's go and do some Houdini.
3. Do
We trust the blueprint. It should be color by numbers from here. That stored up adrenaline- jack it up a IO stream. This is what you're born to do.
I'm an IPA guy and I want flavor. I go for "New Sweden IPA". A bit heavy but I like to go out strong. On the audio side it's all Petar Dundov, a silent cab driver in the urban night. Code or nodes doesn't matter. Whatever is fastest. We need to move. Implement what you've planed for, nothing more. You're a race car, if you miss a curve you don't go back to do it better. Just GO. Write notes on the side about what you leave behind. I had some branches hanging in air that wasn't picked up by the intersection check. Leave it. Just GO.
Write pseudo code first, then actual code. Close that Chrome tab. Finish those wranglers first.
I then recommend Everyday IPA. Better to step down for longevity's sake but stay in the zone. Speaking of endurance, while I'm listening to deep techno I still go for headphones with a rather bright sound. It's the low tones that wears out the brain.
Result can be found in the hip file below. Notice how the result is more or less identical with the design layout.
5. Aftermath
It's done and so are you.
To top the malt I go for something sharper. A while back I ordered a Benriach 12y which is excellent. We want to do more, it was so much fun, so much purpose. But we probably can't.
Maybe color the nodes. Or write a blog post.
Epilogue
Yea. So that's how you do it in the biz. It's a first version that we can show the artist. They could reject it completely so better not to fix those bugs yet.
I'm sure there are other approaches that people take for good reasons. Offline have a completely different perspective and I'd love to hear how that has been refined over the years. Some are whine people which I'm sure have implications on method. Looks like the Motion Graphics folks really are working with some off the shelf material, looks very inspirational.

Comments